Using Autotracking - Standard Edition Only


|
Using Autotracking - Standard Edition Only |
|
|
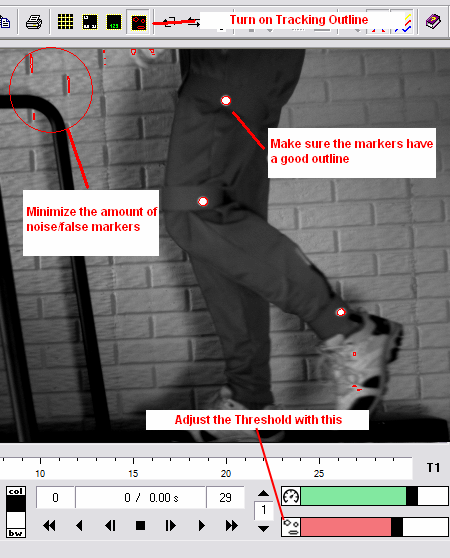
Threshold
The MaxTRAQ autotracker tracks in an 8 bit gray scale image. It locates the markers by means of thresholding. What this means is that a pixels that is above or below a certain threshold will be considered part of a marker or the background. Since were tracking in 8 bit gray scale, our threshold levels range from 0 (black) to 255 (white). You can let MaxTRAQ determine the threshold level or you can set it manually (see Tracking Parameters). To help you to determine the optimal threshold level, MaxTRAQ can display an outline of what the tracker considers markers (red lines). To turn this on, select Tracking Outline from the View menu or click on the Tracking Outline tool button
Note that if you have selected Autodetect Background then the outline will not be displayed until you have picked at least one marker.
Adjust the threshold so that the markers are well outlined while minimizing the amount of noise/false markers.
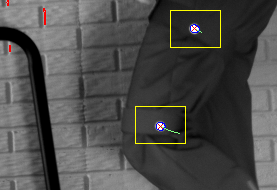
Search Window
This specifies the size of the area where the tracker will look for the markers in the next frame. Use a higher value if you have fast and jerky motions and a lower value for slow and smooth motions. The lower the value, the lesser of a chance that the tracker misidentifies a marker. The size of the window will shrink during the first 3 frames as the predictor buffer is filled and the tracker can do a better job of predicting the next location of the marker.
To help you determine the optimal search window size MaxTRAQ can draw the window around the markers. Use the Tracking Options dialog to turn this feature on. Note that the window is drawn with the size that will be used to track the next frame. Adjust the size of the search window from the Tracking Options dialog.
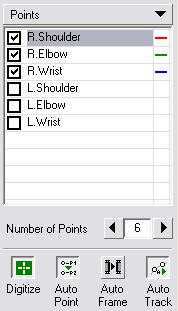
Selecting the Points to Track
In some applications you may not want to track all the markers at the same time. Reasons for this may be that you may need different tracking settings for different sets of markers or a bilateral marker setup. You can also track one marker at the time by deselecting AutoPoint. By using the checkboxes in the point table you can select/deselect the markers that you want to track. To display the checkboxes, check Table Check Boxes in the Vie wmenu.
In this example, we are only tracking the right arm markers.
|