|
You can change the behavior of the Autotracking feature from the MaxTRAQ Options dialog box. The tracking parameters are divided into 2 sections, Tracking Settings and Markers. The Tracking Settings consists of the following:
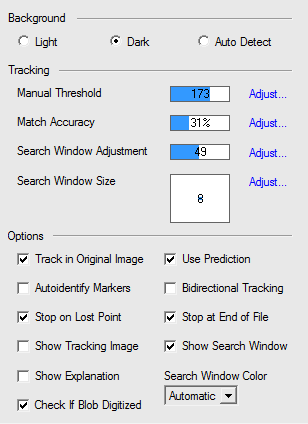
| Background | Specify if you have a light background with dark markers or dark background with light markers. If you select Auto Detect, then MaxTRAQ will automatically determine the background by using the current digitized points as a reference. |
| Match Accuracy | The match accuracy specifies how well the detected markers must match between frames. A higher value will ensure better tracking. Use a lower value if you have poor image quality or the shape of the markers is changing a lot between frames. |
| Search Window Adjustment | Specified how much the Search Window Size will change between the first 3 frames. This is in percent of window size. Since the predictor will be more accurate the more frames there are in the predictor buffer, the smaller the search window needs to be. |
| Search Window Size | This specifies the size of the area where the tracker will look for the markers in the next frame. Use a higher value if you have fast and jerky motions and a lower value for slow and smooth motions. The lower the value, the lesser of a chance that the tracker misidentifies a marker. The size of the window will shrink during the first 3 frames as the predictor buffer is filled and the tracker can do a better job of predicting the next location of the marker. Size is specified as the percentage of the video ranging from 1 to 100. You can display the search window by checking Show Search Window. |
| Set Image Threshold | If unchecked, MaxTRAQ will try to detect the optimal threshold for each of the images. In some cases, it is necessary to manually set the threshold. To manually set the threshold, check this item and then use the slider to set the desired threshold. The best way to determine the optimal threshold is to use the Tracking Image Window (see Advanced Tracking). To display this window, make sure Show Tracking Image is checked. |
| Track in Original Image | If left unchecked, MaxTRAQ tracks in the image that is being displayed on the screen thus allowing you to adjust the brightness and contrast of the image. If checked, then it uses the original, unprocessed image. Note; that MaxTRAQ will always track in a B/W image. |
| Autoidentify Markers | This will assign IDs to each marker automatically with the first marker found being Point #1, second marker Point #2 and so on. This is mostly useful when you have a few markers that show up in the same spot every time. |
| Stop on Lost Point | Stop the tracking if the tracker loses a marker. This is useful if you use the Play button and one or more markers were lost. In this case the tracking will stop and you can manually digitize the lost points and then press the Play button again to resume tracking. |
| Show Tracking Image | If checked, the tracker will display a window with the exact image that it is using to locate and track the markers. This window is very useful to make sure the threshold is set properly and the markers are being located. See Advanced Autotracking for more information. |
| Show Explanation | This will display a brief explanation why MaxTRAQ lost a point during tracking. |
| Check If Blob Digitized | Check this to ensure that a marker that has already been digitized will not be used by the tracker again. This is especially useful when you track markers individually. It is also important to know that markers are digitized in sequential order so if, for example, Point #2 has been assigned to a marker, then none of the points after #2 will be using the same marker. |
| Use Prediction | MaxTRAQ uses a 3 point predictor to predict a markers position in the next frame. This is useful when you track continuous motions. Turn this feature off if youre digitizing random marker positions. |
| Bidirectional Tracking | If checked, the tracker will track going in both directions. In normal operations, it will only track in the direction that you started the tracking operation in. If youre at the start of the file then you will be tracking forwards only, and if youre at the end of the file, going backwards, then you will be tracking in the backwards direction only. |
| Stop at End of File | Stops and turns off the autotracking when you have reached either end or beginning of the file depending on your tracking direction. |
| Show Search Window | Draws a rectangle around the search window in your video while tracking. It will only be displayed during autotracking but can be very useful if you keep loosing points. |
| Search Window Color | The color of the search window. |
The Markers section consists of the following parameters:
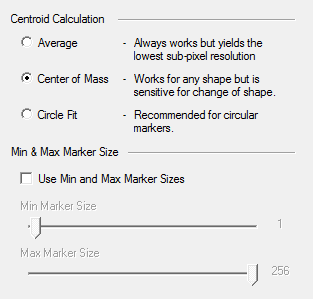
| Centroid Calculations | Here you can select the method to use for the centroid calculation of a marker. You can select between Average, Center of Mass and Circle Fit. The Average method always works but yields the lowest sub-pixel resolution. The Center of Mass works for any shape but can be more sensitive to change of shape. Circle Fit is the recommended method for circular markers such as hemispheres. |
| Min and Max Marker Size | Using the min and max marker size is an effective way of filtering out false markers. Use the sliders to remove false markers but make sure the real markers are still there. Use the Show Tracking Outline  feature when adjusting the min and max marker size. feature when adjusting the min and max marker size. |
|